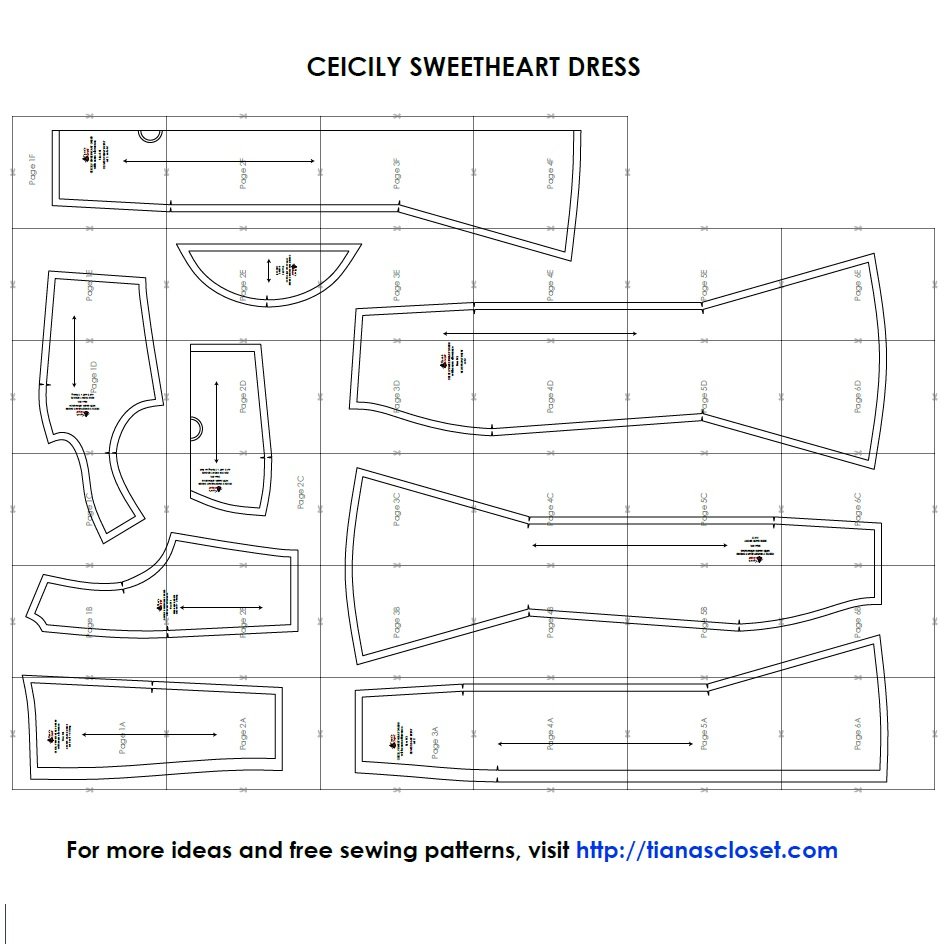
You will see that there are 2 sets of lines on each pattern piece. The inner lines are sewing line (and you sew along these lines), and the outer lines are cutting lines (you cut the fabric along these lines, remember the folding lines where you have to fold the fabric before cutting). The distance between sewing line and cutting line is seam allowance, and it varies from point to point. For example, the side seam allowance is about 1/2 inch (1.2cm), and seam allowance at hemline is 1 inch (2.5cm). This is the reason why I do not remove the sewing lines from the pattern. Please use it as a guide to know how much seam allowance you need to give at each seam.
The fabric will be cut into following pieces:
- Center Front Bodice: cut 2 self fabric + 2 lining fabric
- Side Front Bodice: cut 2 self fabric + 2 lining fabric (mirrored)
- Center Back Bodice: cut 2 self fabric + 2 lining fabric (mirrored)
- Side Back Bodice: cut 2 self fabric + 2 lining fabric (mirrored)
- Center Front Skirt: cut 1 self fabric on the fold
- Side Front Skirt: cut 2 self fabric mirrored
- Center Back Skirt: cut 2 self fabric mirrored
- Side Back Skirt: cut 2 self fabric mirrored
- Sleeve: cut 2 self fabric
Place the pattern pieces on the fabric, pin the pattern pieces to the fabric to secure them in place. Using sharp scissors, carefully cut out the fabric pieces along the outer lines of the pattern. Take your time to ensure precise and clean cuts, as this will affect the fit and overall appearance of your garment.
Make sure to mark all notches and other design features such as darts, pleats, draw marks etc. from the pattern pieces onto your fabric. When sewing the garment, pay attention to notches, they must match up.
Sewing instruction:
1. Serge/zig zag stitch the raw edge of the skirt pieces to prevent fabric from unraveling. The bodice is fully lined so no serging is needed.
2. Place 2 Center Front Bodice pieces right side facing and sew the center front seam.
3. Place the Center Front Bodice and one Side Front Bodice right side facing, pin and sew the princess seam. Repeat with the other side.
4. Place one Center Back Bodice and the corresponding Side Back Bodice right side facing, pin and sew the back princess seam. Repeat with the other pair to get 2 pieces of Back Bodice.
5. Place Front Bodice and Back Bodice right side facing, pin and sew shoulder and side seams to get the Dress Bodice. Repeat the steps with lining fabric to get the Bodice Lining. Press all seam allowance to the sides.
6. Place Dress Bodice and Bodice Lining right side facing, matching all notches and seams, pin and sew the neckline. Turn over and press seam allowance toward the lining fabric, trim seam allowance and clip the curves. Staystitch seam allowance on the lining fabric.
7. Fold and sew the Sleeve hem. Gather the cap of the Sleeve to match the measurement from the notch on the front armhole to the notch on the back armhole. Pin the Sleeve to the Dress Bodice and sew to join.
8. Place Center Front Skirt and one Side Front Skirt right side facing, pin and sew to join. Repeat with the other side. Repeat to join the Side Back Skirt and Center Back Skirt to get the Skirt piece.
9. Place the Skirt and the Bodice right side facing, pin the Skirt to the Bodice and sew to join. Remember to match all seams before sewing.
10. Attach invisible zipper to the back of the dress.
11. Fold and sew the hem of the dress. Use bias binding to finish the raw edge of the armholes. Sew buttons to the center front of the dress bodice.


 PinDIY
Post time 2024-6-3 10:50
PinDIY
Post time 2024-6-3 10:50


 set top card
 Colorizer
 Drop the Thread Top
 Jack
Jack
 chekccard
 Post time: 2024-6-3 19:26